Thursday, 21 April 2016

Plan + Final Piece (1)

For my first final piece I plan to create a very vibrant, unique and visually satisfying image. I also intend to use editing techniques/options such as overlaying, colour enhancing, tweaking and other general settings in order to achieve the best possible outcome. Here are the photos:


To achieve these pictures, I used two photos and essentially merged them together with a transparent effect (Overlay). 

Here are the original photos (from which I picked the one below):


I really liked these photos of the lights because of how they come out on the camera. The bubbly/dotty effect is also known as 'Bokeh'. Bokeh is the Japanese term for the aesthetic quality of the blur produced in the out of focus parts of an image produced by the lens.

As you can see, I had quite a selection to choose from and ended picking the one shown.

Here is the original photo for the sky part of the photo:


Fish Eye lens experiment

What is a Fish eye lens?

A fisheye lens is a special type of ultra-wide angle lens. They are small, Ultra-wide, and show a distorted, spherical view of the world, most evident in the curved, outer corners of the photo.

Surprisingly, they work very well underwater. This is because they focus very closely, there are few straight lines underwater, and finally, because of how close you can get to objects; you can capture more sharpness than you would from a mediocre lens.

Below is my own photograph of the landscape whilst using a fish eye lense. I captured the sun in the background which is the main subject within the image, bringing light in the centre. In addition to that, it gives the image a great colour  change from the centre to the borders. The fish eye lens gives the photograph a wide angle with strong visual distortion.

Here are some examples I found online, showing the comparison between a normal photo and fish eye. There were shot with a Tokina 10-17mm fisheye and Sigma 10-20mm.

sigma 10-20mm  lens photo

(Not Fish eye)

Tokina 10-17mm fisheye lens photo

(Fish eye)

As you can see, the subject is in the centre of the image in both photographs, looking relatively identical, until you move to the borders where the edges become 'wider' and subject smaller.

Properties of a Fish eye lens:
  • They are small and compact
  • You can get very close to objects, for maximum sharpness and colour
  • Large depth of field, which is great for shooting from a very wide angle

Below I have increased the vibrance but decreased the saturation. 


Here is the image, with all colour wiped from the picture. I like it, however I prefer the colour as it gives the image more character rather than a mono colour scheme.


Tuesday, 15 March 2016

Selective colour examples - Experiment plan

What is 'Selective Colour'?

I plan to capture fairly basic photos of a landscape, however edit them in photoshop to create the 'selective colour' effect. It is what it sounds like, where a particular element of the image is changed and highlighted. In most cases, the whole photo is changed to a mono, black & white colour scheme with the one particular part kept the same or made even more vibrant. Here are some examples:


As you can see, the effect not only looks awesome and unique. It also highlights a certain part of the photograph, drawing the viewer's attention to the most important part of the image.

Here is a photograph, before and after editing:

The original photo. Image licensed from Fotolia by Photoshop Essentials.com

Photoshop selective coloring effect. Image © 2012 Photoshop Essentials.com

Here are the instructions I intend to follow, in which I found on the same website as the examples above:


Here is the link to the website:

http://www.photoshopessentials.com/photo-effects/selective-coloring/

Panorama examples and Experiment plan

What is Panorama photography?

A panorama is simply, an un-broken view of the whole region surrounding an observer. In simple terms, it allows you to capture a 180 degree view of whatever you please. Here are some great examples below, shot with a Nikon D700, ISO 200, 1/10, f/8.0:


Whilst researching panoramas, I found a website which gave me information on the types and techniques with Panoramas. This is the link to the website: https://photographylife.com/panoramic-photography-howto

Types of Panoramas:

Most people assume there is only one form of panorama, however that is not necessarily true.

1. Wide angle Panoramas - Anything that looks like a wide angle photograph, which covers 180 degrees and less (Horizontally and vertically).

2. 180 Degree Panoramas - These are the typical Panoramas, covering 180 degrees left to right. This is great for covering a large area.

3. 360 Degree Panoramas - These is the extreme option, where you can capture everything surrounding you in one image.

How to Capture a Panoramic photograph:


Thursday, 10 March 2016

Cyanotype examples - Experiment

What is a Cyanotype?

A Cyanotype experiment is a photographic printing process that produces a cyan-blue print. Engineers used the process well into the 20th century as a simple and low-cost process to produce copies of drawings, referred to as blueprints. The process uses two chemicals: ammonium iron citrate and potassium ferricyanide. It has become a popular way amongst artists to produce unique looking images using this photographic process. Here are some examples by other artists:


Below is my experiment. I started off by brushing light sensitive paint (Two chemicals mixed) onto an A6 sized piece of paper, covering the majority of one side. I then placed it in the hot box to dry off. Two days later I printed off a photograph by Edward Weston of a fossil, placed it ontop of the paper and left it for another couple days. As a result (See below), the fossil has merged onto the light sensitive paper. 


Tuesday, 8 March 2016

Andreas Gursky - Biscuit tin final piece w/ Photoshop edits - Ellesmere lake


I love this photo by Gursky because of how unique it is. It sacrifices content/detail for the idea behind it. He has captured the path, ground, river and sky all together showing parallel lines. It is perfectly parallel which makes it so different. So I took a photograph on my phone as a small experiment a while back, shown below:


I've decided I want to use Gursky's concept of Parallel lines in one of my final pieces. However, I don't want it to just be an ordinary image from a DLSR canon camera. I am going to capture it using  black and white film. Not only will it give it vary up my image but it will have a grainy, old fashioned style to it, which personally I love.

Tiny plants - The Wrekin - Final piece + Plan

What is a 'Tiny Planet'?

A tiny planet, or more professionally known as a Spherical Panorama, is a 360 degree image that uses a special post processing technique. It creates such a unique and special image with the final result.

Here is how you create a Spherical Panorama:


For this final piece, I plan to go to the Wrekin hill on the 12th of March to capture the necessary photographs. I've chosen the Wrekin as its not too far from home and the views I could capture would really work well with my tiny planets final piece. 

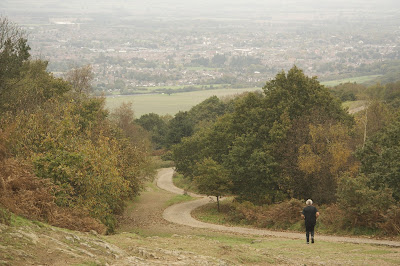
Below are some photos of the Wrekin itself from distance:


However, I will be using photographs from the top of the Wrekin only for my Tiny Planet image. Here are a couple of photos showing what sort of dense, detailed views I'll photograph:


I plan to capture photos sharing the same sort of views as these ones, then turn them into 'Tiny Planets'. I have been inspired by other artists who have created tiny planets through photoshop, such as this image by Benjamin Jopen:


Obviously this is done in an urban landscape, but it still represents the same concept and idea.

Here is an example which is more related to how mine will look by artist Alexander Tikki: